I'm just a busy wife and mom who loves to cook (and hates to clean up afterward), balancing the many hats I wear and trying to look cool, calm, and collected while doing it...

Oh, and I rarely measure anything when I cook, so consider yourself warned. Love good food. Try new things. Eat to your heart's content.

Sunday, October 20, 2013

Harvest Dump Cake


Harvest Dump Cake


Dump cake.
That's, like, the worst name for a dessert ever.
 
Or maybe I should just get out of the 3rd grade frame of mind. I blame my almost-8-year-old daughter... whom I love and adore, and thinks the word "duty" is hilarious.
 
But really, for this kind of dessert, that's pretty much all you have to do. Dump it all in a pan, without even having to stir, and bake away.
 
This particular cake combines two of the best Fall flavors: Apples and Pumpkin. It's Autumn on a plate! And is especially yummy served warm, with vanilla ice cream.
 
Now if only this So. Cal. weather would get the hint that it's Fall and cool down so I could wear sweaters and boots already...


Harvest Dump Cake

1 box (15 oz) Spice Cake Mix

1 can  (21 oz)Apple Pie Filling

1 can (15 oz) Pumpkin Pie Filling (Not Puree)

3 Tbsp. Brown Sugar

Pinch of Salt

1 envelope Spiced Apple Cider Drink Mix (optional)

1 1/2 sticks Butter, melted

 
Preheat oven to 350, and grease or butter a 9x13 pan.
 
Combine apple pie filling, pumpkin pie filling, brown sugar, and salt.
 
Spread evenly in greased pan. Sprinkle package of apple cider mix over the apple/pumpkin filling.
 
Top evenly with the dry spice cake mix.
 
Pour the melted butter evenly over the cake mix. (There will be some dry spots. Don't stir it though!)
 
Bake for 45-60 minutes, until the top is golden and the sides are bubbly.
 
Golden top...
 
Bubbly sides...
 
 
Serve warm, with vanilla ice cream.


And PS you should really smell my house right now. AMAZING!


Saturday, October 19, 2013

Bananananana Bread Pancakes


There is something really comforting about fresh, homemade-from-scratch banana bread, especially when it's hot out of the oven.
 
And it's perfectly alright to eat it for breakfast. Just ask Bill Cosby's #1 Fan, AKA my mom, who is a firm believer in cake, of any kind, for breakfast.


But for those of you who are not firm believers in Bill Cosby's Cake For Breakfast Belief (It's a thing. Really. My mom said so.), these pancakes are a pretty close second to actual cake-for-breakfast, and they're pretty easy too.


Banana Bread Pancakes
 
2 cups Bisquick Mix
 
2 tsp. Baking Powder
 
3 Tbsp. Brown Sugar
 
3 large, very ripe bananas, pureed (or mashed really, super well)
 
2 Tbsp. Oil
 
2 Eggs
 
1 tsp. Vanilla Extract
 
About 1 tsp. Cinnamon (more or less if it's your thing...)
 
1 cup Milk
 
Heat a non-sick griddle over medium heat while preparing the batter.
 
Combine all ingredients in a medium mixing bowl, and whisk until everything is well incorporated.
 
Make sure your griddle is hot enough by flicking a couple drops of water on it. If it sizzles and evaporates right away, it's ready. If not, just wait a few more minutes. DO NOT put your batter on a griddle that's not hot enough, you'll be left with no pancakes and a big mess.
 
Using a 1/3 cup measuring cup, pour out the batter onto the hot griddle. When the pancakes bubble on the top an the bubbles don't fill back in, and the sides don't look as "wet", flip those babies. Repeat until all batter is used up.
 
Makes up to 18 pancakes, which will last in your fridge for a few days after you make them... perfect for those school/work mornings that you want hot breakfast but don't have time!
 
I like these topped with a little butter and maple syrup (I'm a purist, what can I say?!)
 
BUT for a real kick, try them "Elvis Style", topped with warmed peanut butter and crumbled, fresh cooked bacon.


Thursday, October 10, 2013

That Pumpkin Time of Year...


It's that time of year...

Pumpkin everything !

I'm not complaining at all. I LOVE me some pumpkin stuff, and look forward to this time of year when it's socially acceptable to make everything I eat with this favorite orange squash. A couple years ago I even tried it in a Penne Pasta dish. YUM!

But sometimes it's hard to find a really good recipe for pumpkin bread or muffins, because, lets face it, these recipes are about a dime a dozen right now, and you never know which are tried and true. It can be overwhelming, to say the least.

This recipe is one I came up with a couple years ago and have made many times. It works as both bread and muffins. I am also including the variations I've used, in case you want something a little different (or you're like me, you didn't have everything for the original recipe so I made this one to satisfy my pumpkin bread craving!)

This makes 2 dozen regular sized muffins, 4-5 mini loaves (depending on how big you want 'em), or 2 regular loaves.

I don't like chunks of fruit and stuff in mine usually, but you can definitely add cranberries, raisins, white or regular semi-sweet chocolate chips, and/or whatever nuts or seeds you want.

Pumpkin Spice Bread

3 cups Self Rising Flour (Or 3 cups All Purpose Flour + 1 1/2 tsp. Baking Powder)

1 tsp. Salt

1 tsp. Baking Powder

1 tsp. Baking Soda

1 Tbsp. Ground Cinnamon

1/2 tsp. Ground Cloves (Variation: 1 tsp Ground Allspice)

1/2 tsp. Ground Nutmeg (Variation: 1 Tbsp. Fresh Grated Ginger, but add it to the wet ingredients)

1 Stick of Butter, Softened

1 can Pumpkin Puree (NOT the pie mix!)

1 can Sweetened Condensed Milk (Variation: 1/3 cup Pure Maple Syrup + 1/3 cup Milk)

1/2 cup Oil

4 Eggs

3/4 cup sugar

1 cup Packed Brown Sugar

1 1/2 tsp. Vanilla Extract

Optional* 1/2-1 cup craisins, raisins, chocolate/white chocolate chips, nuts, etc... whatever combination you want, if you're into chunks of stuff in your bread...

Preheat oven to 350 and grease the loaf pans or muffin tins.

In a medium mixing bowl, combine flour, salt, baking powder, baking soda, cinnamon, cloves or allspice, and nutmeg.
With an electric mixer, combine butter, pumpkin, sweetened condensed milk (or maple syrup+milk), oil, eggs, sugar, brown sugar, and vanilla. (Also fresh ginger, if you're using it.) Beat until well combined.
Slowly add the flour mixture, until combined, scraping down the sides of your bowl as needed.
Beat on medium-high speed for another minute or so.

Pour into your loaf pans/muffin tins.

For 2 dozen muffins, bake 22-25 minutes, until a toothpick in the middle comes out clean.
For 4 mini loaf pans, bake 47-53 minutes, until a toothpick in the middle comes out clean.
For 2 regular sized loaf pans, bake 55-65 minutes, until a toothpick in the middle comes out clean.


Tuesday, October 1, 2013

Coconut Red Curry Chicken and Bean Thread Noodles

Coconut Red Curry Chicken and Bean Thread Noodles
 
Ok, so this coconut-Thai-red-curry-chicken-noodle-dish started out as my version of this soup that I came across thanks to Pinterest.
 
Only, as a mom, I had other things to do at the same time as dinner (like check Facebook and Instagram, yo!), and therefore I let it cook a little longer than I maybe should have and the noodles soaked up most of the broth.
 
BUT...
... It was a great mistake, because this ended up a super yummy, saucy, Thai-ish noodley dish instead!
 
I even went back for seconds. And almost thirds, but I refrained, since Imma be havin' it for lunch tomorrow too.
 
 Boo. Ya.
 
(PS This would be super easy to make vegan/vegetarian, and is also gluten free!)
 

Most of the ingredients...
 
Coconut Red Curry Chicken and Bean Thread Noodles
 
3-4 Tbsp. Thai Red Curry Paste (more or less depending on your preference)
 
2 14 oz cans Light Coconut Milk
 
1 26 oz box (or a little over 3 cups) Chicken Stock
 
1 overflowing tsp. Fish Sauce
 
Juice of 1 Lime
 
1 Tbsp Light Soy Sauce
 
1 Red Bell Pepper, cut into bite size chunks
 
1 cup Frozen Peas
 
1 cup Snow Peas, cut in to bite size pieces
 
1 package Bean Thread Noodles (3pack tray... in the Asian section of the grocery store)
 
2 cups Cooked Shredded Chicken (Thank you Costco, for your rotisserie goodness!)
 
1/4 tsp. White Pepper
 
Fresh Grated Ginger (Probably about 2 tsp... like usual I didn't measure, but it was about an inch of the root)
 
1/2 cup Fresh Cilantro, chopped, plus more for garnish
 
Sriracha Hotness for garnish, if desired
 
 
In a large pot over medium heat, whisk together the red curry paste and about 1/2 cup of the coconut milk.
 
Once combined, add the rest of the coconut milk, chicken stock, fish sauce, soy sauce, and lime.
 
When it's getting hot, add the red peppers, frozen and snow peas, ginger, and cilantro.
 
Bring to a boil.
 
Add the noodles and shredded chicken, and cook until the noodles are soft and see-through, and until the desired consistency is reached.
 
Dish it up and garnish with more chopped cilantro and as much sriracha as you like.

In its soup form...


Mmm...  fresh cilantro!
 
 
Saucy noodle form...


Enjoy!

Saturday, September 28, 2013

'Cause Who Doesn't Like Their Veggies Hidden In Cheese?!


This one's an new twist on the classic Spinach Artichoke Dip, and who doesn't love that stuff?!

I'm totally that mom who sneaks vegetables into my kids (and husband's) food, usually without any of them knowing, and this is no exception. It's spinach, artichokes, zucchini and mushrooms (and sometimes kale and tomatoes!) hidden in gooey, yummers cheese.

I usually make mine is a 9x13 baking dish, but you could easily put it into a couple of bread bowls (or make individual ones with pretzel rolls.... gasp!!)

Leftovers are also fantastic as a spread for a turkey BLT sandwich, or on baked potatoes!

Oh man, now I'm hungry!

Hot Veggie Dip

1 Small Onion, diced small

4 Cloves Garlic, pressed

3 Tbsp. Butter

1 tsp. each Salt and Pepper (more or less to taste)

1 Medium-Large Zucchini, diced

1 8oz. pkg. Mushrooms, diced

1 10oz. pkg. Frozen Spinach, defrosted and WELL drained ( when it's defrosted, I put it all in a tea
towel, and squeeze it to death)

1 Can Artichoke Hearts in Water, well drained and chopped

1-2 cups Fat Free Half and Half

1-2 pkgs. Cream Cheese

2 cups Shredded Jack Cheese

1 cup Parmesan cheese, divided

1 Roma Tomato, diced small

In a large pot/Dutch oven, saute the onions with the salt and pepper. When they are soft and translucent and on the verge of caramelizing, add the garlic, zucchini, and mushrooms. After these veggies are tender and the water has cooked out of them and reduced, add the drained spinach, artichokes, half and half, cream cheese, jack cheese, and 2/3 cup of the Parmesan cheese. Stir until melted and well combined. Spread evenly in a 9x13 baking dish, and top with remaining 1/3 cup Parmesan cheese.

Bake at 400 for 30 minutes, or until top is melted and browned a bit.

Top with the diced tomato.

Serve with french bread or pita chips.

Enjoy!


Chocolate Chip Brownies with Peanut Butter Chocolate Frosting... Because "Shark Week"

 
Sometimes the only cure for certain... monthly ailments... is chocolate overload.
 
And oh boy, do these super easy brownies do it for me!
 
I use the $.98 family size box of Market Pantry brownie mix from Target. These are seriously THE BEST brownies from a mix. And for less than a buck, you can't beat 'em!
 
Add chocolate chips, chocolate frosting, and peanut butter, and you're in business!
 
I don't know what else to say about these, other than they're easy and delicious, and will bring world peace.
Well, at least they're the first two things...
 
 
Chocolate Chip Brownies with Peanut Butter Chocolate Frosting
 
1 family size (9x13) box brownie mix.
 
1/2 cup oil
 
1/4 water
 
2 eggs
 
3/4 cup chocolate chips
 
1 can Betty Crocker Rich and Creamy chocolate frosting
 
1/2-3/4 cup creamy peanut butter (you can use chunky if you want...)
 
Preheat oven to 350.
 
Combine brownie mix, oil, water, eggs, and chocolate chips until well incorporated, but don't over mix.
Bake for 24-26 minutes.
 
While those are baking, remove the foil cover from the can of frosting. Pop it in the microwave for about 45 seconds, stirring every 15 seconds or so. When it's a nice, warm, melted consistency, add the peanut butter right into the can, and stir until combined.
It should be melted enough to just pour out, so when the brownies are done and still hot, pour it over the top, and spread it around evenly. Pop it back in the oven for another 5-7 minutes, until the top is set.
Remove, and let cool at least 15-20 (if you can... so you don't burn your mouth!)
 
Enjoy!


Tuesday, September 3, 2013

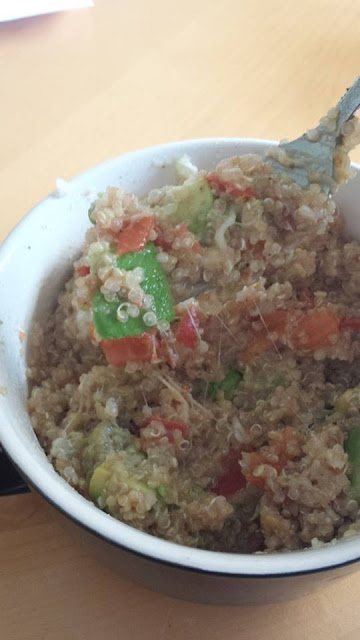
Quinoa For One, Please!

 
As a stay at home mom, sometimes hot dogs or peanut butter and jelly just don't cut it at lunch time!

And since I'm trying to eat healthier AND save money, eating out isn't really an option...

So, this was a pretty quick and easy meal to throw together! And it's a good source of protein**, veggies, and fiber.

And it's delicious!

Avocado Tomato Quinoa for One

1/4 cup Quinoa, rinsed well
1/2 cup Water
A Sprinkle of Garlic Salt
1/2 tsp. Onion Flakes
1 Small Roma Tomato, diced
1/4 Avocado, cut into chunks
3 Tbsp. Shredded Mozzarella Cheese
1 Tbsp. Grated Parmesan or Romano
Fresh Ground Pepper
Drizzle of Balsamic Vinegar

In a small saucepan, combine the rinsed quinoa, water, garlic salt, and onion flake. Bring to a boil. Reduce heat to low, and let simmer for 10-15 minutes, or until the quinoa is translucent and soft, and the water is absorbed.

Stir in diced tomatoes. Transfer to your bowl or plate of choice. Add the cheeses and avocado, and top with fresh ground pepper and a drizzle of balsamic vinegar.

Ta-da!! It's that easy...

**Quinoa is the only plant-based complete protein, or so I've heard...

(Note: Quinoa is much like rice... always use 1 part quinoa to 2 parts liquid ratio. And always make sure it's rinsed well first. I don't know why. That's just part of the "quinoa cooking rules".)


Thursday, August 29, 2013

Overnight Oatmeal!


Mornings always come too soon in our house. Especially during the school year.

I always make sure my kids eat, but I don't always eat myself, and therefore become grumpy and easily irritated.

I'm like a walking Snickers commercial when I don't eat a good breakfast.

This make-ahead oatmeal is yummy and filling, and with the added fruit and yogurt, it's pretty darn healthy too! And it's ready pretty much as soon as you get up!

I like it cold, but it would be good heated as well. And really, the toppings are endless...
Peanut (or Sun, or almond, or cashew... or COOKIE) butter and jelly, Nutella, dried fruit, fresh fruit, chocolate chips, nuts, wheat germ or ground flax seed... do with it as you please!

Overnight Refrigerator Oatmeal

3/4 C. Old Fashioned Oats (not quick oats... they'll get too mushy)

1 Tbsp Agave Syrup (or Real Maple Syrup, or 2 Tbsp. Brown Sugar... or no sweetener if you aren't a fan of sweets. Whatevs.)

3/4 C. Milk (I use nonfat, but sub any kind you use, or water even, but milk makes it more rich and creamy)

A Sprinkle of Cinnamon (Optional)

After the oatmeal is ready...
1/2 C. Yogurt of your choice (optional)
Toppings of your choice. I used fresh mango, raspberries and blackberries.


In a container with a lid, combine the oats and the agave. Pour the milk over it so the oats are covered. Cover with the lid, and put in the fridge.

Go to bed. Sleep.

Get up.

In the morning, take it out.

(*If you want it hot, heat it now, before you put toppings on it. You know your microwave better than I do, so you can decide how long you need to heat it, but my guess is about a minute.)

Top with the yogurt, and whatever other toppings you like.

Eat.

Enjoy.

Yum.


Monday, April 1, 2013

Ain't Yo Mamma's Meatloaf... Cake?!


April Fools Day. A day for being a trickster. Really, that seem like every day in our house! And no, this post isn't a joke, though it's probably been close to a year since my last post!

My kids were super excited when I told them we were having cake for dinner... little did they know it was meatloaf (full of veggies no less!) and mashed potatoes!

My 7 year old daughter thought it was hilarious!
My 3 year old son was not very happy with me!
Muahahaha!!

This meatloaf recipe is one I get asked for ALL THE TIME! It's made people who claim to hate meatloaf into believers again. And goes great with mac & cheese, as well as the classic mashed potatoes.

And if my kids (and hubby) have no idea the dreaded veggies are all up in this, then I'm guessing yours won't either...

Meatloaf

2 lbs ground beef, pork or turkey (or combine 2 different kinds, or all 3... whatever...)
1 smallish zucchini -super diced in a food processor
a handful of baby carrots- super diced in a food processor
1/2 of a yellow onion- super diced in a food processor
About a 1/2 cup of seasoned breadcrumbs
2 eggs
A couple teaspoons Worcestershire sauce
1/4-1/2 cup ketchup
A few Tablespoons A-1 sauce
A couple teaspoons 21 Seasoning Salute from Trader Joe's
A generous sprinkle of Garlic powder
Salt & Pepper

Combine it all (I use my hands, that way it doesn't get tough...)
Form it into a loaf in a baking dish, bake for an hour to an hour and 15 minutes at 375.

If you're making it into cake form, like what is shown in the pictures, spread the meat mixture evenly into two 9in cake pans, bake at 375 for an hour, let "rest" for about 10 minutes before transferring the first meatloaf cake-patty to a cake stand. Evenly spread mashed potatoes over it, enough so that it's about an inch thick. Add the second meatloaf cake-patty, and put the rest of the potatoes on top, and spread evenly around, covering all the way down the sides. Top with diced steamed carrots for decoration.