I'm just a busy wife and mom who loves to cook (and hates to clean up afterward), balancing the many hats I wear and trying to look cool, calm, and collected while doing it...

Oh, and I rarely measure anything when I cook, so consider yourself warned. Love good food. Try new things. Eat to your heart's content.
Showing posts with label easy. Show all posts

Friday, December 29, 2017

Homemade Tomato Basil Soup and Three Cheese Grilled Cheese

Homemade Tomato Basil Soup and Three Cheese Grilled Cheese


Well, it's been actual years since I've blogged, due to life being so super crazy, changing jobs, kids' schedules, etc. but while looking at my "Memories" popup thing on Facebook, I came across this recipe I made years ago, before I even started this blog, and thought, "Hey, why not. I mean, It's practically just copying and pasting, right?" 

So here I am. Blogging something. Who'd of thought I'd get back here again. (Certainly not me...)

Anyway, this recipe is comfort food at it's finest. It really takes you back to childhood, only this time, it's a little more flavorful. And even if it's not a loaf of soup from a can and a slice of cheese-product wrapped in cellophane on Wonder Bread, it's still pretty easy.

Soup:
2 Large (28 oz.) cans of crushed tomatoes (fresh are good too, but it's a lot of work skinning and seeding that many tomatoes) 

1 jar pasta sauce (we like Hunt's Four Cheese in the can, actually)
1/2- 1 Whole Onion, diced
5 or so cloves of garlic
Salt and pepper to taste 
3/4 - 1 cup or so fresh basil 
1 box free range/organic chicken (veggie works too, for you vegetarians) stock
 A cup and a half or so of fat free 1/2 and 1/2
1/2 Cup Finely Shredded or Grated Parmesan Cheese, plus more for topping
Ricotta Cheese, if desired


Just saute the onion and garlic in a little olive oil until soft/translucent, then add everything else, and simmer for at least 30 minutes (the longer the better though). This is also good topped with a little dollop of ricotta and some more fresh basil "confetti", along with the Parmesan


Sandwiches: 

Smoked Gouda 
Sharp Cheddar 
Havarti 
Sourdough Bread
Butter
*You can use any combo of cheeses you'd like. We just really liked these. 

Lightly butter the outside of two slices sourdough, add desired amount of cheese, and grill until golden brown and the cheese is melted. Repeat for each sandwich you want to make. 


Enjoy!

Friday, April 11, 2014

Gnocchi with Bacon, Tomatoes, and Kale

Don't mind my crappy counter tops...

I've been so busy with nurturing my newest geek-mom blog, I've hardly been here to post. It's been months! I'm so sorry for the neglect!

So, I'm not sure how many of you out there subscribe to the Food Network Magazine, but in our house, it's one of our favorites! We love the way the recipes are laid out and easy to find, not to mention actually do-able, unlike other cooking magazines (I'm lookin' at you Bon Appetit!).

This recipe is one I got from the most recent issue of Food Network Magazine, only I added to it, and put my own spin on things, like I usually do with recipes.

Of course, my four year old hardly tried it, since it didn't look like pizza or a hamburger.

My eight year old, however, really liked it, even though it had the dreaded "green stuff".... Kale!! She ate it all. Even though she's still complaining that I made her eat kale. Two. Hours. Later.

This recipe seems fancy, so you could serve it at a dinner party, but it's also easy enough to throw together, and would even be great for potlucks.

It's hearty, somewhat quick/easy, and pretty cheap (about $3/serving).

And gnocchi (pronounced nyo-key) is fun to say.


Gnocchi with Bacon, Tomatoes, and Kale
 
3-4 Tbsp. Olive Oil
3 Strips Thick Cut Bacon, cut into 1/8-1/4 inch bits
1/2 Onion, diced
3/4 Bag Pre-Washed, Pre-Cut Kale (I get mine at Trader Joe's, but Costco sells it too. Or about 4-5 cups hand chopped kale)
2 Packages Potato Gnocchi
2 Cup. Cherry Tomatoes, cut in half (Plus a drizzle of Olive Oil for roasting)
3/4 cup Fresh Grated Parmesan-Romano Cheese
1/3 Cup Fat Free Half and Half
Salt and Pepper
 
Preheat your oven to 425. Toss your cherry tomatoes with a drizzle of olive oil, and sprinkle with salt and fresh pepper. Roast for about 10-12 minutes, until tomatoes are soft and starting to brown on the edges. Remove from oven and set aside. (You don't have to roast the tomatoes if you don't have time, or just don't feel like it. It just adds to the flavor of the dish when they're roasted. If you choose not to, just add the halved tomatoes right before the gnocchi to make sure they cook through.)
 
At the same time the tomatoes are cooking, bring a large stockpot of salted water to a boil, like you would for noodles. When it comes to a boil, add the gnocchi. When they float to the surface, cook them for another 4-5 minutes. The package will have different directions, but they never come out done enough for us, so I always cook them a tad longer. but if you like 'em firmer, cook according to the directions.
 
While those things are going (there's a bit of multi-tasking going on here, I know... but I believe in you!), you can heat the olive oil in a large skillet, and add the bacon. Cook the bacon until it is well browned and crispy.
 
Add the onions and cook then until they're tender and translucent.
 
Add the chopped kale, and sprinkle with salt and pepper. Cook until the kale is completely wilted and soft.
 
Stir in the roasted cherry tomatoes.
 
The gnocchi should be done now. Carefully scoop it out of the pot with a spider (The cooking tool. Not the arachnid.) or a slotted spoon. Add about 3/4 cup of the gnocchi water (this sounds odd, but trust me. It makes for a great sauce base.).
 
Stir it together.
 
Add the Parmesan-Romano cheese and the half and half, and more salt and pepper if needed. Heat until thickened, about 3-4 minutes more.
 
Serve with more Parmesan-Romano, and maybe even a little crushed red pepper flake if you want to spice it up, sprinkled on top.
 
This makes about 6 hearty servings.
 
Enjoy.


Sunday, October 20, 2013

Harvest Dump Cake


Harvest Dump Cake


Dump cake.
That's, like, the worst name for a dessert ever.
 
Or maybe I should just get out of the 3rd grade frame of mind. I blame my almost-8-year-old daughter... whom I love and adore, and thinks the word "duty" is hilarious.
 
But really, for this kind of dessert, that's pretty much all you have to do. Dump it all in a pan, without even having to stir, and bake away.
 
This particular cake combines two of the best Fall flavors: Apples and Pumpkin. It's Autumn on a plate! And is especially yummy served warm, with vanilla ice cream.
 
Now if only this So. Cal. weather would get the hint that it's Fall and cool down so I could wear sweaters and boots already...


Harvest Dump Cake

1 box (15 oz) Spice Cake Mix

1 can  (21 oz)Apple Pie Filling

1 can (15 oz) Pumpkin Pie Filling (Not Puree)

3 Tbsp. Brown Sugar

Pinch of Salt

1 envelope Spiced Apple Cider Drink Mix (optional)

1 1/2 sticks Butter, melted

 
Preheat oven to 350, and grease or butter a 9x13 pan.
 
Combine apple pie filling, pumpkin pie filling, brown sugar, and salt.
 
Spread evenly in greased pan. Sprinkle package of apple cider mix over the apple/pumpkin filling.
 
Top evenly with the dry spice cake mix.
 
Pour the melted butter evenly over the cake mix. (There will be some dry spots. Don't stir it though!)
 
Bake for 45-60 minutes, until the top is golden and the sides are bubbly.
 
Golden top...
 
Bubbly sides...
 
 
Serve warm, with vanilla ice cream.


And PS you should really smell my house right now. AMAZING!


Tuesday, September 3, 2013

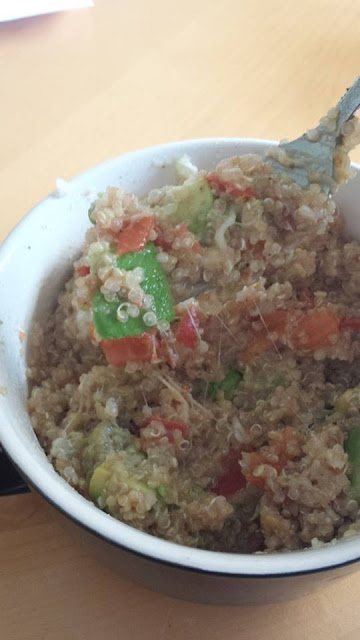
Quinoa For One, Please!

 
As a stay at home mom, sometimes hot dogs or peanut butter and jelly just don't cut it at lunch time!

And since I'm trying to eat healthier AND save money, eating out isn't really an option...

So, this was a pretty quick and easy meal to throw together! And it's a good source of protein**, veggies, and fiber.

And it's delicious!

Avocado Tomato Quinoa for One

1/4 cup Quinoa, rinsed well
1/2 cup Water
A Sprinkle of Garlic Salt
1/2 tsp. Onion Flakes
1 Small Roma Tomato, diced
1/4 Avocado, cut into chunks
3 Tbsp. Shredded Mozzarella Cheese
1 Tbsp. Grated Parmesan or Romano
Fresh Ground Pepper
Drizzle of Balsamic Vinegar

In a small saucepan, combine the rinsed quinoa, water, garlic salt, and onion flake. Bring to a boil. Reduce heat to low, and let simmer for 10-15 minutes, or until the quinoa is translucent and soft, and the water is absorbed.

Stir in diced tomatoes. Transfer to your bowl or plate of choice. Add the cheeses and avocado, and top with fresh ground pepper and a drizzle of balsamic vinegar.

Ta-da!! It's that easy...

**Quinoa is the only plant-based complete protein, or so I've heard...

(Note: Quinoa is much like rice... always use 1 part quinoa to 2 parts liquid ratio. And always make sure it's rinsed well first. I don't know why. That's just part of the "quinoa cooking rules".)


Thursday, August 29, 2013

Overnight Oatmeal!


Mornings always come too soon in our house. Especially during the school year.

I always make sure my kids eat, but I don't always eat myself, and therefore become grumpy and easily irritated.

I'm like a walking Snickers commercial when I don't eat a good breakfast.

This make-ahead oatmeal is yummy and filling, and with the added fruit and yogurt, it's pretty darn healthy too! And it's ready pretty much as soon as you get up!

I like it cold, but it would be good heated as well. And really, the toppings are endless...
Peanut (or Sun, or almond, or cashew... or COOKIE) butter and jelly, Nutella, dried fruit, fresh fruit, chocolate chips, nuts, wheat germ or ground flax seed... do with it as you please!

Overnight Refrigerator Oatmeal

3/4 C. Old Fashioned Oats (not quick oats... they'll get too mushy)

1 Tbsp Agave Syrup (or Real Maple Syrup, or 2 Tbsp. Brown Sugar... or no sweetener if you aren't a fan of sweets. Whatevs.)

3/4 C. Milk (I use nonfat, but sub any kind you use, or water even, but milk makes it more rich and creamy)

A Sprinkle of Cinnamon (Optional)

After the oatmeal is ready...
1/2 C. Yogurt of your choice (optional)
Toppings of your choice. I used fresh mango, raspberries and blackberries.


In a container with a lid, combine the oats and the agave. Pour the milk over it so the oats are covered. Cover with the lid, and put in the fridge.

Go to bed. Sleep.

Get up.

In the morning, take it out.

(*If you want it hot, heat it now, before you put toppings on it. You know your microwave better than I do, so you can decide how long you need to heat it, but my guess is about a minute.)

Top with the yogurt, and whatever other toppings you like.

Eat.

Enjoy.

Yum.


Friday, January 13, 2012

Homemade Bread... (using yeast!! *gasp*)

UPDATE: This bread is good right out of the oven... but hard as a rock and brick-like the next day. I suggest eating it quick. Otherwise it's gross! Next time I try making bread, I'll be using a better recipe for sure. :/

Last week the igniter went out in our oven. Eight days later, it was fixed. In those eight days, I don't know what came over me, but all I could think about was wanting to bake something. (So today I baked cookies two ways, then made dinner in the oven, and now this...)
I am not a baker. Probably because it takes measuring ingredients out, and if you don't get the chemistry right, things just don't turn out. Cooking is much more forgiving than baking, in my opinion, which is why i usually stick to that, and bake only on the very rare occasion, like holidays and birthdays. That, and I'm lazy.

Even more rare than me baking, is me using yeast when baking. It scares me. Scares me to the point where we had frozen rolls when I hosted Thanksgiving this year, which is just plain wrong. In fact, this is the very first recipe in which I've EVER used yeast. I don't know why it scares me, but it does.

Today I might have conquered my fear.

I baked bread.

While browsing Pinterest I came across a recipe for soda bread which led me to a blog where I got the original idea for this Easy Little Bread. This blogger stated that if you are afraid to use yeast, then this is a perfect recipe to start with. And it looked so very simple with only eight ingredients.

I did change it up just slightly, by using two cups of white whole wheat flour, instead of one cup AP flour and one cup whole wheat flour, and I only guessed on how much honey I added, but I'm sure it was more than one Tbsp. I also added about a 1/2 Tbsp of butter to the dough, brushed the top with melted butter in the last 4-5 minutes of baking, and did not put it under the broiler. The broiler is another fear of mine. But we'll save conquering that one for another day...

I can tell you it smells delightful as it bakes. I can also tell you that it is the most unattractive loaf of bread I've ever seen. Ever. It makes Sloth from The Goonies look attractive. That's how ugly this thing is. It's simple, dense and crumbly.

But it is good. With butter all over it while it's warm. And homemade strawberry jam from your neighbor (Thank you Deanna!!).

See, it is what's inside that counts.

Oat-Wheat Bread (For Beginners)

1 1/4 cups warm water (105-115F)
2 tsp active dry yeast (or one packet)
1 Tbsp honey
2 cups white whole wheat flour
1 cup rolled oats (not instant)
1 1/2 tsp fine grain sea salt
2 Tbsp butter, melted (1 1/2 Tbsp for coating the pan, 1/2 Tbsp to add to the dough) + extra for brushing on top
Preheat the oven to 350F, with a rack in the middle.

In a small bowl, add the yeast into the warm water and stir until the yeast dissolves. Set aside... the yeast will activate within 5 - 10 minutes. It will all of a sudden move... not quite fizz, but you'll know when it happens...  Then stir in the honey.

Meanwhile, mix the flour, oats, and salt in a large bowl. Add the wet mixture to the dry and stir very well (I used my hands, hence the lack of pictures). The dough is very dry. Add the butter toward the end of stirring, and this will help get the last dry bits incorporated.

Brush a 9 in. loaf pan very generously with the melted butter. Put the dough into the pan and pat gently to disperse it evenly. Cover with a clean, slightly damp cloth or paper towel, and set in a warm place for 30 minutes, to rise. It's not going to rise much. Just enough to kind of fill in the pan a bit.

Bake the bread for 35-40 minutes, until golden and pulling away from the sides of the pan.

Remove from oven and spread or brush more melted butter on the top. Put it back in the oven for 4-5 more minutes.

Remove from oven, and turn the bread out of the pan right away onto a rack (so it doesn't steam in the pan).


Serve warm, with butter (and jam!).


Makes 1 loaf.